15 suggestions for mounting fish finders on boats
You have been frugal and invested in a brand-new fish detector that boasts the most recent technological advancements; nevertheless, you are now responsible for mounting it on the boat. What should one do when there are seemingly endless possibilities?
It can be complicated because every boat has a unique design and shape and because there are so many various mounts available for purchase. We’ve been there and carried that out numerous times!
We have compiled a list of the best fish finder mounting ideas to assist you to get out on the lake. You should be able to choose the best installation method for your new fish finder using at least one of these suggestions.
Mounting Ideas for Fish Finder
Think about where you want to mount the device before you do anything else. Some of these mounting options work better on the bow than the console, and the reverse holds as well. begin with some fundamental definitions.
- Console/Dash: This is the area that houses the steering wheel, gauges, and instrument clusters. You use the console’s fish finders when the main engine is operating and you’re actively looking for fish and structure or traveling to a new fishing location.
- The trolling motor: is positioned on the bow of the boat, which is at the front of the craft. Fish finders that are installed on the bow are put to use when the trolling motor is engaged and the vessel is actively fishing in or trolling through an area.
- Mounting for Quick Removal: Consider if you will permanently mount the fish finder or regularly remove the device.
- Kayaks and small boats: have much less room for mounting hardware, which restricts your mounting options and the size of equipment you can hold.
Installing your new graph need not be a demanding process. Examine your boat and choose a few suitable mounting positions first, then look over this list of suggestions to see which style of mount would be most effective.
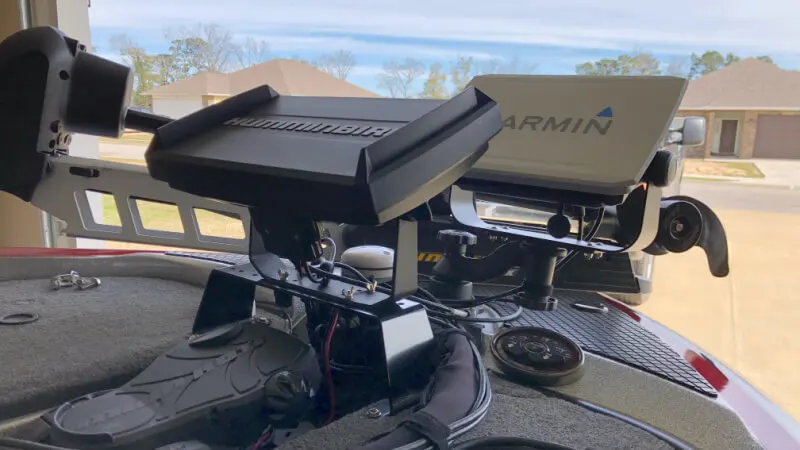
1. Mounting in the Dashboard (Flush Mount)
A fish finder can be mounted neatly by flush mounting in-dash. Small fish finders that are already flush-fitted to the console are frequently included with new boats.
A great-looking in-dash mount has some limitations due to the console’s size. Particularly bass boats have shrunk, and units larger than 7 or 8 inches cannot be mounted in the dash.
Each manufacturer provides its flush mount kit specific to the unit in question. To attach the finder to the dash plate, gaskets, brackets, and hardware are often required. Sheet metal is used extensively in the construction of Humminbird IDMK Kits, in contrast to the adhesive-based gaskets and a few screws that are utilized by Garmin and Lowrance.

Pros:
- Clean appearance
- Mounted Fixed
Cons:
- Size Restrictions on Consoles
- Steering wheel blocks the screen
- Not Easily Removed
2. Mounting the gimbal
The gimbal mount that came with your fish finder is excellent for installing a fish finder but is frequently disregarded. The brackets include ready-to-mount mounting holes, come with hardware, and are made to safely hold your particular unit. The only limitation is that a flat area sufficiently large to mount the bracket to the deck or gunnel is required.
Pros:
- Created for and supplied with your unit
- Solid & Secure Moun
- Tiltable
- Rapid Removal
Cons:
- No Swive
- Mounting Space Is Necessary.

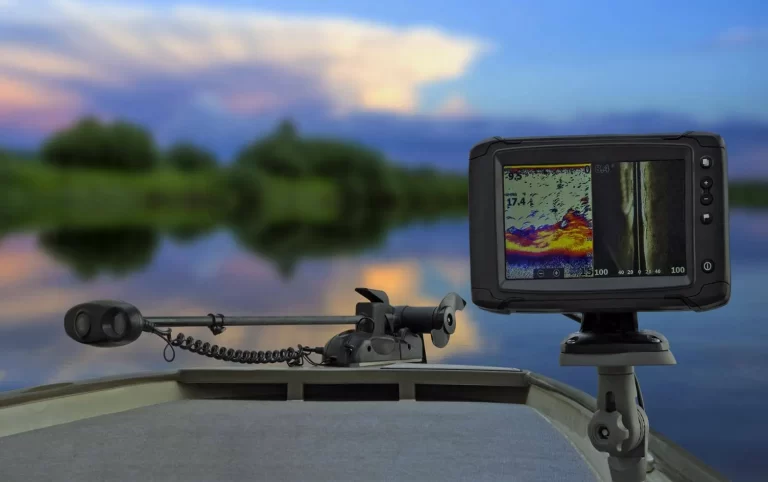
3. RAM Swing Arm Mount
One of the most underestimated and unappreciated options for installing a fish finder is this RAM mount. It works well for mounting next to the console, in front of the trolling motor, or wherever there is a lack of room.
The pedestal mount base raises the height of the fish finder, bringing the screen into a more comfortable viewing position for you. You get the great level of adaptability you require from the swivels. Additionally, the base plate has already had holes drilled in it so that the gimbal mount can be mounted on it.
Do you think this setup is superior to the standard RAM ball and socket mount? Absolutely, according to our experience. In general, it is more stable in choppy water without slipping or flopping onto the deck because the swivel knobs may be tightened down firmly.

Pros:
- Versatile
- Highly Modifiable
- Stable and Safe
Cons:
- Need for Through-Hole Bolts
4. The Bow Bridge Mount
In modern fishing boats, recessed trolling motor pedals are almost normal. To mount your primary fish finder, use a bridge mount, which is essentially a sheet metal bracket that spans over the recessed region.
These mounts are incredibly sturdy, improve screen visibility, and can be set up in a variety of ways. Finding the right brand and type for your boat will be the most difficult task, especially if you plan to place two fish finders.
The by PROcise Outdoors are excellent; you can choose from a variety of designs with various angles and GPS puck mounts to best match your boat. There are a lot of great brands out there, like Precision Sonar and BoatLogix.

Pros:
- Brings the screen closer for easier viewing
- Returns priceless deck real estate
- Tightly mounted
Cons:
- Need for large through holes or lag bolts
- A variety of selections from various brands with comparable appearances
5. A Console Bridge Mount
If you do not have sufficient space to attach the gimbal bracket to the dashboard, you can use a dash bridge mount to raise your fish finder above the dashboard and position it so that it is not in the way of the steering wheel.
A Dek-It Dash mounts are available with one fish finder or two fish finders. These mounts are excellent for bass boats and fishing boats with sturdy dash plates but insufficient room to attach flat or next to the gimbal directly.

6. Ball & Socket Mounting System for Marine Applications by Ram
For attaching fish finders, RAM mounts have long been favored. They are easy to use, incredibly adjustable, and reasonably priced. Depending on the needs of your boat, they have a small base and various arm lengths.
RAM Ball & Socket mounts function optimally with fish finders that are either small or medium in size. This is because larger fish finders have a greater propensity to lose their hold on the rubber balls over time. As a result, when you hit a large wake or crash into a wave, your locator may slip and flip around.

7. Mount Ice Fishing
If you want to get the most out of your ice fishing trip, you need to be sure that your fish finder is mounted appropriately. If you follow some simple instructions, you’ll be an expert in no time at all, despite the fact that at first glance it could appear to be difficult.
If you want to be successful at ice fishing, the first thing you need to do is purchase a transducer of good quality. With the help of this apparatus, which will generate the sonar waves that allow you to locate fish beneath the ice, you will be able to do so.
As soon as you receive the transducer, you ought to start thinking about where you will mount it. Mount it so that it is as close to the centre of your ice fishing hole as you can get it. This is a good rule of thumb. When you do this, you will obtain the most precise readings possible. We ought to begin drilling right away. To do this, you must first drill a hole large enough to hold your transducer out of the ice. It is possible to shatter the ice if you drill too closely to its edge; therefore, you should take care to avoid doing so.

Once the hole for the transducer has been bored, you can move on to the next step of attaching it. Before anything else, the transducer has to be attached to the mounting bracket. After that, you’ll need to attach the bracket to the ice using screws.
You will need to attach the transducer to your fishfinder when you have finished mounting it. The fish finder has to be connected to the relatively short cable that is included with the majority of the transducers.
8. Swivel Mount by Johnny Ray
For placement on consoles or gunnels with flat surfaces above the steering wheel, swivel mounts work nicely. Certain types of center console boats and smaller fishing boats are constructed in this manner.
For this use, the Johnny Ray swivels are excellent. They have a base that is fixed in place and a removable push-button swivel plate.
The mounting plate is molded from tough glass-reinforced nylon, while the base is made of metal. Through the use of the lever release, the plate may be swiftly removed and rotated 360 degrees.

9. Track Mounting
For some smaller boats and kayak fish finders, track installation is fairly frequent. The tracks make it incredibly simple to attach a variety of tools and accessories to your boat.
A beautiful universal track fish finder mount is made by YakAttack and will fit practically any tiny device from the leading manufacturers. The mount utilizes secure ratcheting arms and pre-drilled plates rather than balls and sockets to hold the device in place.

10. Kayak Mounts by Railblaza
An innovative kayak fishing mount mechanism is produced by Railblaza. After purchasing a Starport base that attaches to rails or goes through the hull, you will receive an R-Lock R fish finder mount as a free bonus.
The mount features three adjustment axes and a predrilled mounting plate for securing the device without using a gimbal mount. When it comes to fishing from kayaks and small boats, the entire system is incredibly portable yet durable.

11. Mounting for SUPs
If you fish on a regular basis, you are probably aware of how much of an improvement in your catch rate a good fish finder can make. If this is your first time taking part in the activity, however, you might not know how to attach a fish finder to your stand-up paddleboard (SUP) (stand-up paddleboard).
The following is a brief explanation on how to successfully complete it:
Determine where your fishfinder will work best and move it there. You ought to mount it in a location that is not only visible but also easily accessible. Attach the transducer to your paddle board in a safe and secure manner. You can either use an adhesive attachment or bungee cords to secure your transducer to your stand-up paddleboard in the event that it does not already have a built-in mount. Use the power cable to join your fish finder and its accompanying transducer.

Attach the actual fish finder to the boat. Fish finders typically come with suction cup mounts already attached, making them an excellent choice for mounting on paddle boards. Get ready to cast your line as soon as you’ve activated your fish finder!
12. mounting Surface
An additional option that is frequently used is a surface mount. Surface mounts are minuscule devices that are placed on the surface of the water and send signals that are used to produce a picture for a fish finder. Surface mounts are also known as submerged mounts. After receiving these signals, the fish finder unit uses them to generate an image of what is happening below the surface of the water in real time.
When surface mounting your fish finder, there are a few things you should keep in mind before getting started. Make sure that the surface mount is installed in a location that has very little to no trash at all.
When you do this, you can ensure that the signals are not muddled in any way, and that the images displayed on your fish finder are as clear as they can possibly be. You have the responsibility of ensuring that the surface mount is installed in an area that provides adequate visibility, sunlight, and water flow. If you follow these steps, you will reduce the likelihood of signal interference and improve the readability of the image on your fish finder.

It is a fantastic idea to surface mount your fish finder so that you can get the most out of your investment and ensure that you will be able to locate fish while you are out on the water. If you keep these tips in mind while you’re surface mounting your fish finder, you’ll be able to do it like a pro in no time!
13. Rotated Mount
The following is a straightforward instructional guide on how to swivel mount a fish finder:
Before you can use your fishfinder, you have to find a suitable location for it. Finding a spot where the transducer can be submerged without running into any obstructions is an extremely important step.
After you have determined the most suitable location, drill a hole in the hull of the boat. Using the screws included in the package, secure the swivel mount to the fish finder. You are prepared to start fishing as soon as the transducer is finally submerged in the water.
Pro Advice:
- Before you drill a hole in your boat, it is a good idea to secure the swivel mount to a piece of plywood or another solid surface. This step should be done before you begin drilling the hole. If you do this, your boat will be safe from any harm that might have been caused.
- Keep your fish finder away from areas where there is a lot of turbulence when you are trying to decide where the best place to put it is. This will increase the likelihood that the transducer will operate in an appropriate manner.

14. Mount Kong
Big water fishermen love the KVD Kong mounts made by T-H Marine. They are excessively sturdy and made to handle the beating from large waves. The cost of that robustness is quite a bit higher than that of comparable RAM mounts

15. Pedestal Mounts
The proliferation of “live” forward-facing sonar systems, like Livescope, Active Target, and MEGA Live, has made these extra-tall mounts commonplace.

Simply said,
A pedestal is a long pole with a base that is screwed to the deck. When seated on a chair, the screen can be raised to eye level using a pole that is several feet long.
You must nearly always keep an eye on the screen when using live sonar to monitor the behavior of the fish and your bait. By raising the screen to almost eye level, a pedestal fish finder mount helps to lessen neck and eye strain.


One Comment